I love my home, but the floorplan is a bit odd. It’s a popular thing in the region: they like to put a room or two adjacent to the front door, neither of which have doors of their own. These rooms seem solely for show rather than function.
I’m not into functionless decor, so I’ve been scratching my head – and staring at a pair of empty rooms – for two years now.
My garage isn’t air conditioned (that’s important in Texas!), and neither is the shed, and I really want a workshop.
I have empty, functionless space that isn’t separated from the rest of the house.
Time to get creative…
The Blank Slate
 My
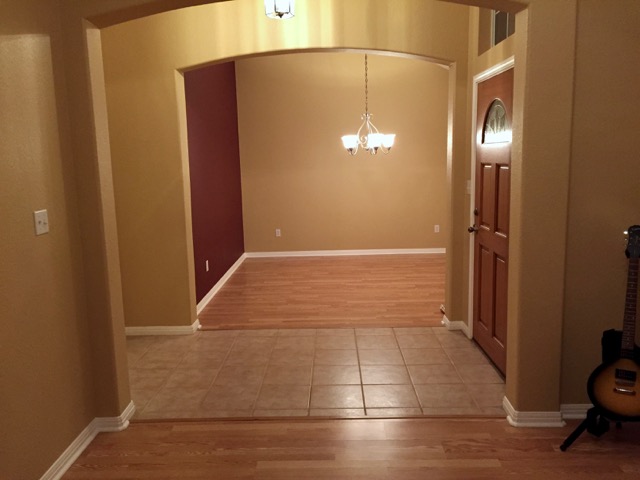
target was the formal dining room. It stands opposite another empty
room, and both rooms sport big, open arches in lieu of one
wall. There’s no chance of adding a door without doing major
structural surgery to the house, and that’s just not happening. Too
much work, and too much expense – and the arches are kinda neat
anyway.
My
target was the formal dining room. It stands opposite another empty
room, and both rooms sport big, open arches in lieu of one
wall. There’s no chance of adding a door without doing major
structural surgery to the house, and that’s just not happening. Too
much work, and too much expense – and the arches are kinda neat
anyway.
It needed to become a workshop, and that introduced some fun requirements:
- It needs to be somewhat closed off from the rest of the house, if only to hide the clutter I can imagine accumulating there over time.
- Bench space must be plentiful and comfortable.
- Lots of storage space is an absolute must.
- Gonna need power, because electronics!
- Which reminds me, it needs a place for test equipment where it can be out of the way of the bench and still be useful.
- A connection or two to the overall home network, of course (and neither room has ethernet!)
- It needs to have character.
Overall it’s a bit of a lengthy list, especially for a single, small, twelve-by-twelve room (with no door!). This was clearly going to be a challenge.
Of course, that last point is a bit vague. How does one define character? I’m still figuring that one out, but I think I’m on the right track…
The Most Important Point…
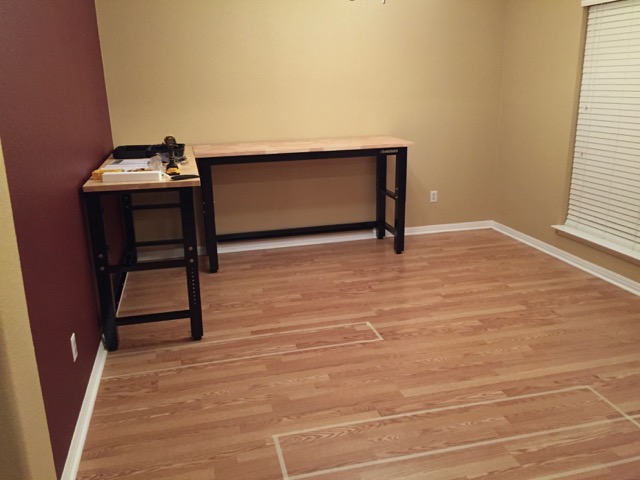 Any
good workshop starts with a good workbench. I was originally going to
build one, but then I came across the 60" Husky benches that Home
Depot sells. They’re expensive, but they’re pretty nice.
Any
good workshop starts with a good workbench. I was originally going to
build one, but then I came across the 60" Husky benches that Home
Depot sells. They’re expensive, but they’re pretty nice.
So I bought a couple and assembled them straight off.
I will give you fair warning if you go down this path: the bench tops are made from very soft wood. These are good benches for light work (electronics, for example), but they’re easily scratched and gouged. Don’t buy them if you expect to be even marginally rough on them. I learned this quickly from experience.
For me, though, they’ll work just fine.
Some Assembly Required…
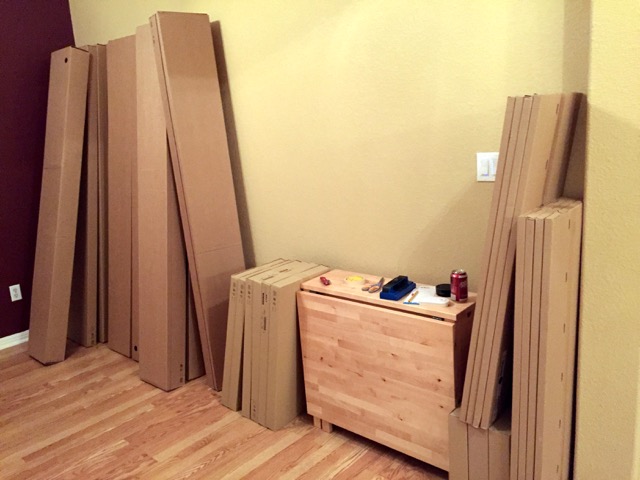 The
hardest part of the project was to figure out how to close off the
space, and without it looking like a man cave that was built by an
actual caveman. After giving it some thought, I decided to kill two
birds with one stone.
The
hardest part of the project was to figure out how to close off the
space, and without it looking like a man cave that was built by an
actual caveman. After giving it some thought, I decided to kill two
birds with one stone.
Rather than try to build and finish some crazy wall, why not just use bookshelves? I need the storage space anyway. I figured that, if done right, I could actually make it look halfway decent.
So a trip to IKEA was in order…
Yeah, that hurt right in the wallet. That place is outright EVIL!
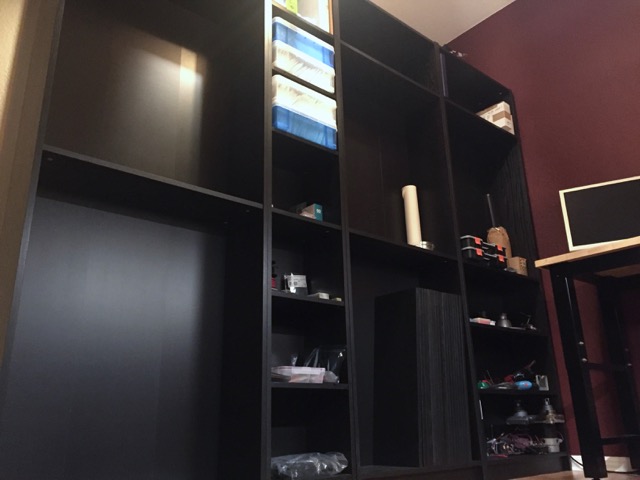
Their BILLY bookshelf system was exactly what I needed. It starts with a simple bookshelf – either fifteen or thirty inches wide, your choice – and about ten inches deep for usable space, at seven feet tall. You can add to that foot-and-a-half tall extensions, and/or add doors to turn your shelves into cabinets.
Yeah, you can see why that caught my attention.
On top of that, the little fifteen-inch shelves are extremely useful if you want little cubbyholes to store stuff in. Perfect, in fact, for holding the smaller Really Useful Boxes that I use for storing my parts.
 Of
course, nothing is ever that simple. I started with the concept of a
line of shelves right up against the arch to block off the room, but
it quickly became apparent that it was going to look terrible. I spent
the next day or two playing Adult Legos, and making additional Ikea
runs…
Of
course, nothing is ever that simple. I started with the concept of a
line of shelves right up against the arch to block off the room, but
it quickly became apparent that it was going to look terrible. I spent
the next day or two playing Adult Legos, and making additional Ikea
runs…
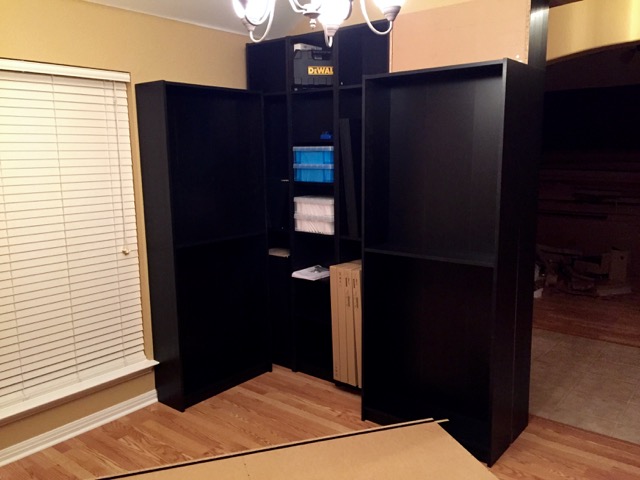
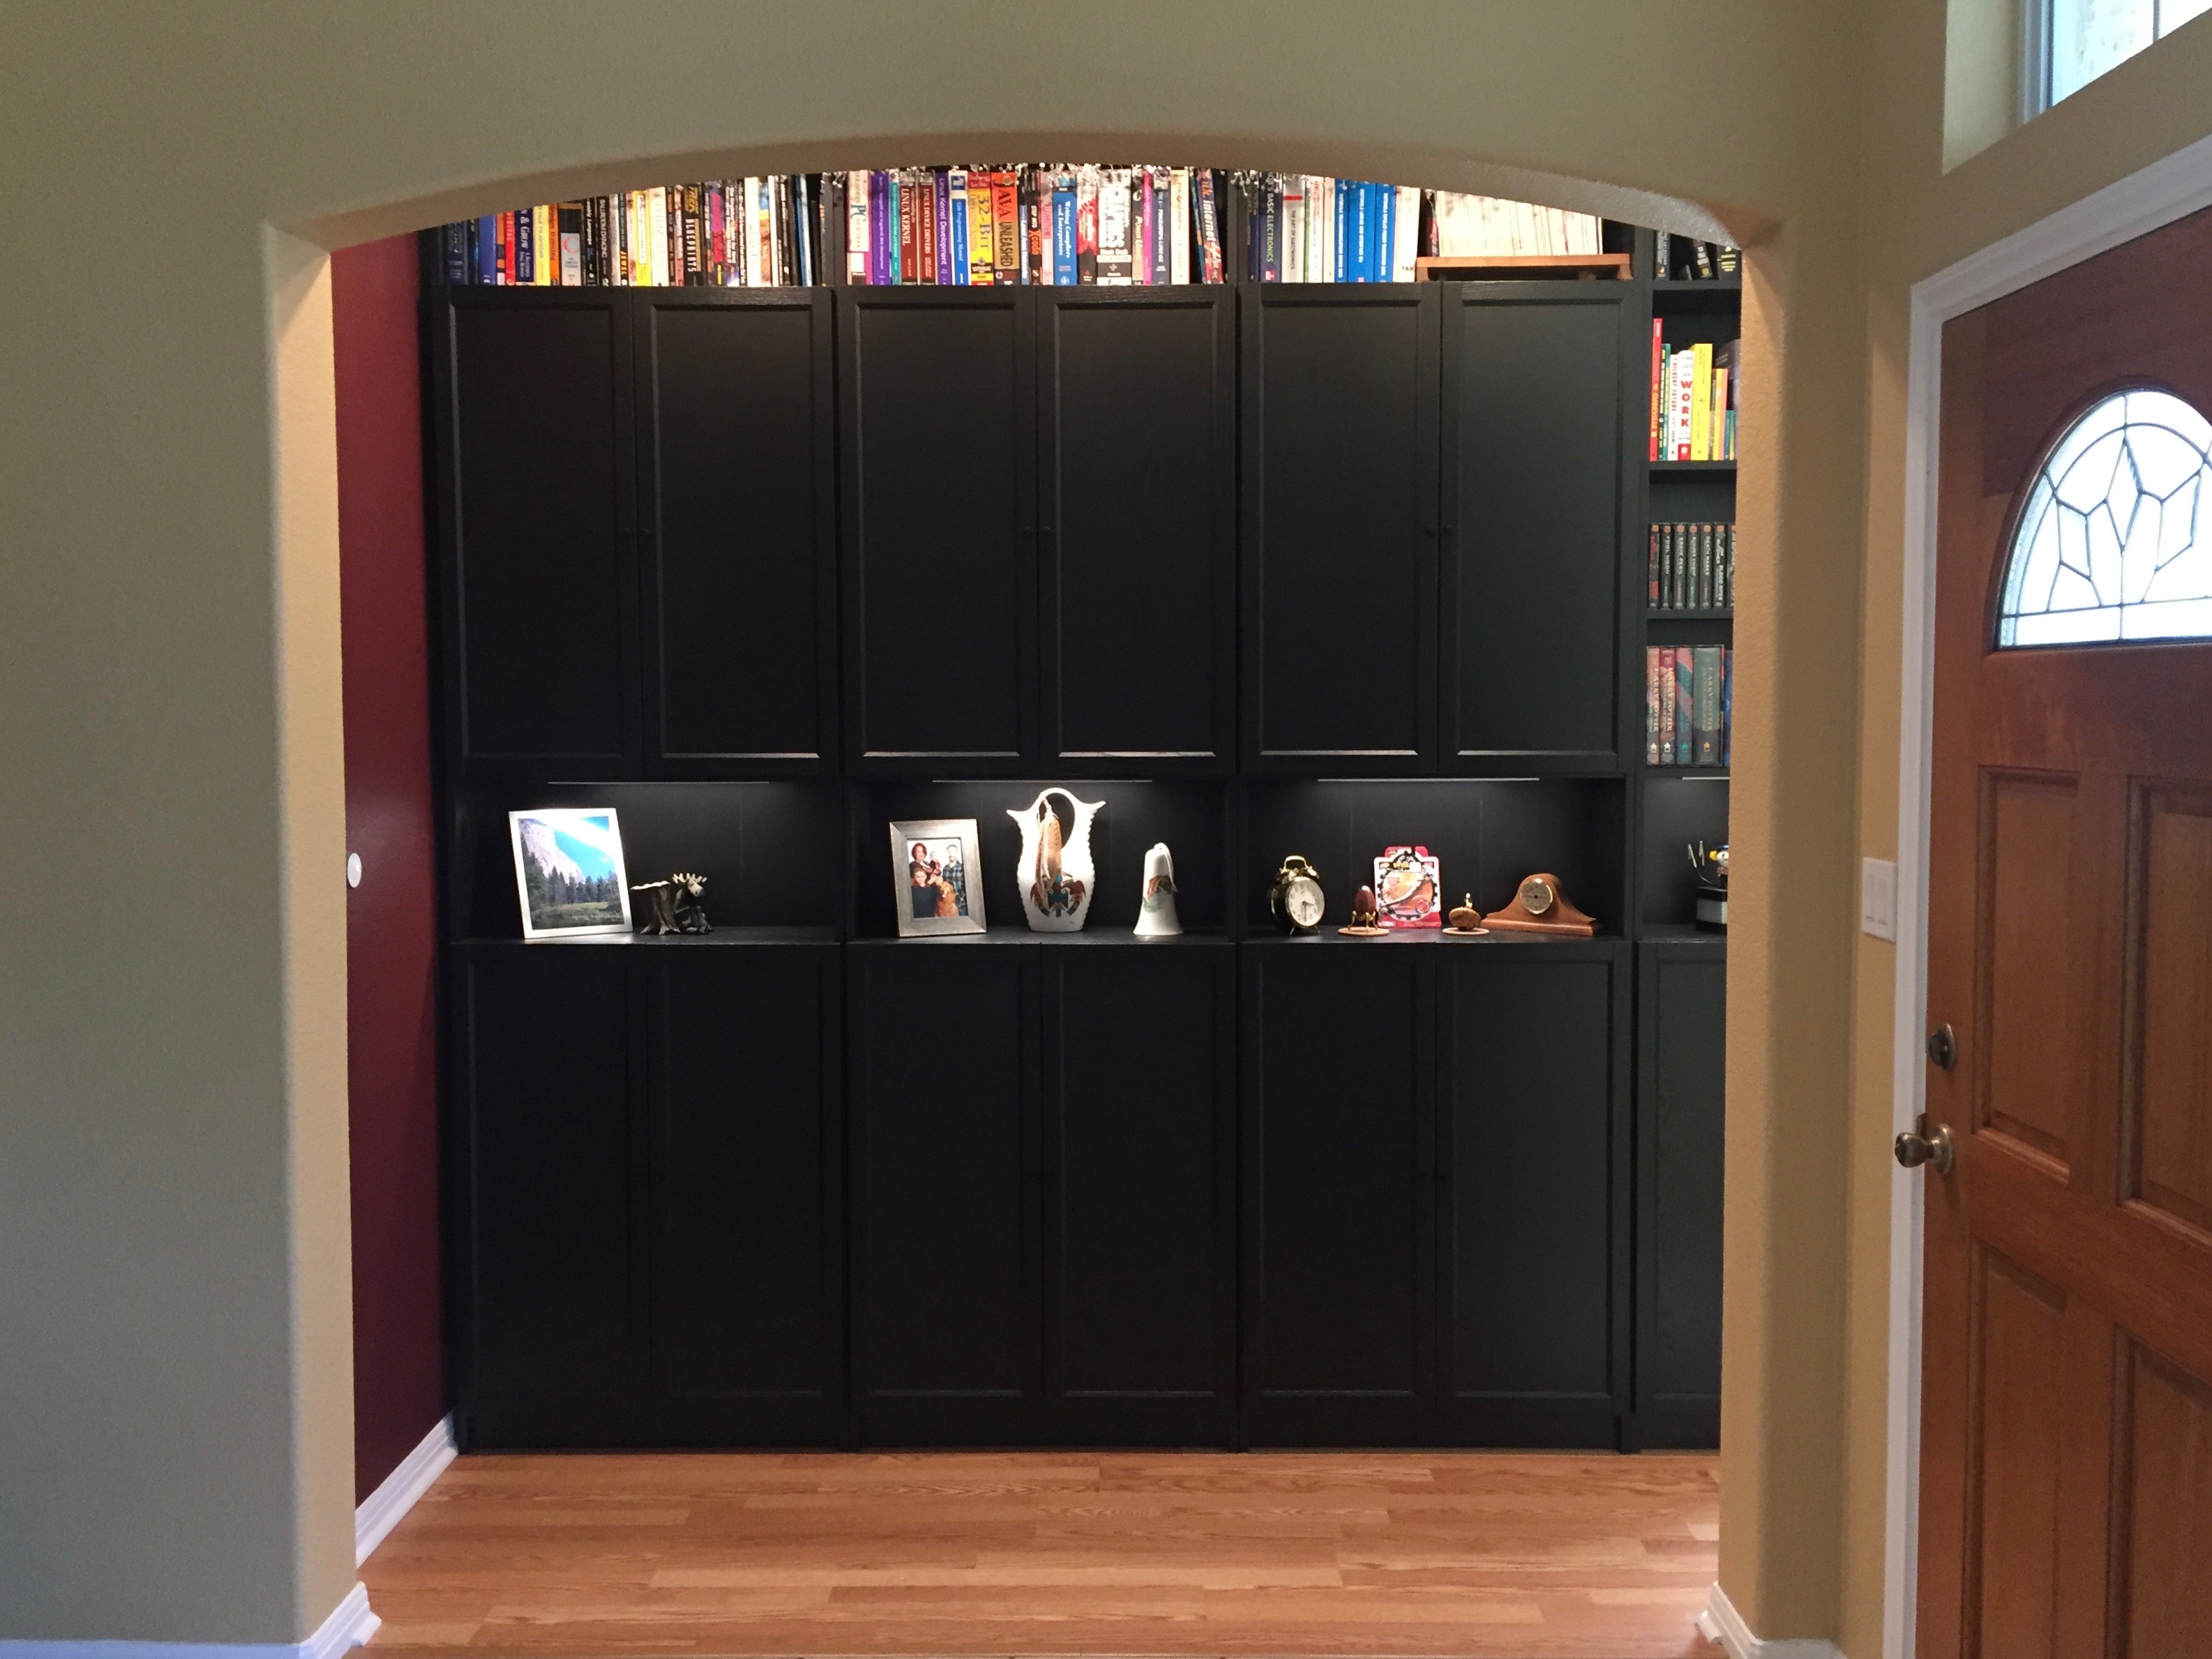
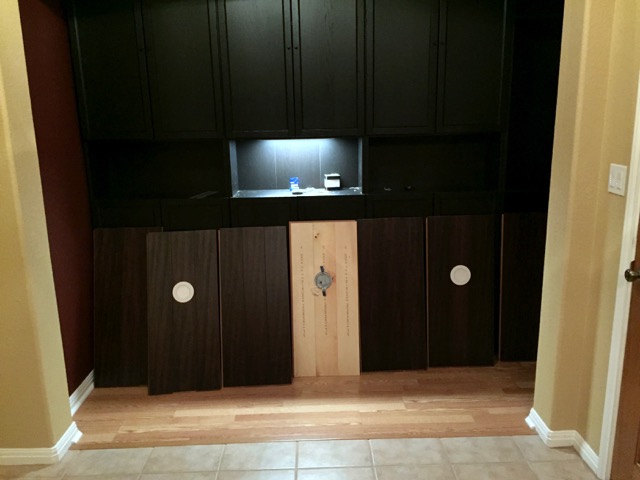
In the end, the simplest concept proved to be the best one. I wanted something that looked decent to people walking in the front door, while still ensuring that they didn’t see the potentially messy benches. The winning layout is a simple wall of back-to-back bookshelves; the ones facing the entryway have cabinet doors, and the ones facing the workshop don’t.
 This
works because my front door is inset by a couple of feet between the
two rooms – you can see this a few pictures up – and the shelves are
slightly longer than the room’s entry. To get to the workshop, you
turn right at the front door, walk through the arch, turn right
again, and then walk around the shelf unit.
This
works because my front door is inset by a couple of feet between the
two rooms – you can see this a few pictures up – and the shelves are
slightly longer than the room’s entry. To get to the workshop, you
turn right at the front door, walk through the arch, turn right
again, and then walk around the shelf unit.
And the best part? A bit of creative decoration, and it looks like it was meant to be that way.
It also gives me somewhere to put superfluous glassware and the like, which has opened up a lot of space in my kitchen cabinets, to boot.
The line of shelves facing away from the workspace has two extensions on top, with only one on the workshop side, which made it a little easier to put all this together. As a finishing touch, I took a can of black Krylon to the back of the upper extensions on the outward-facing shelves; this way the exposed backs don’t look quite so unfinished when you look at them from the workshop side.
But What About The Workspace?
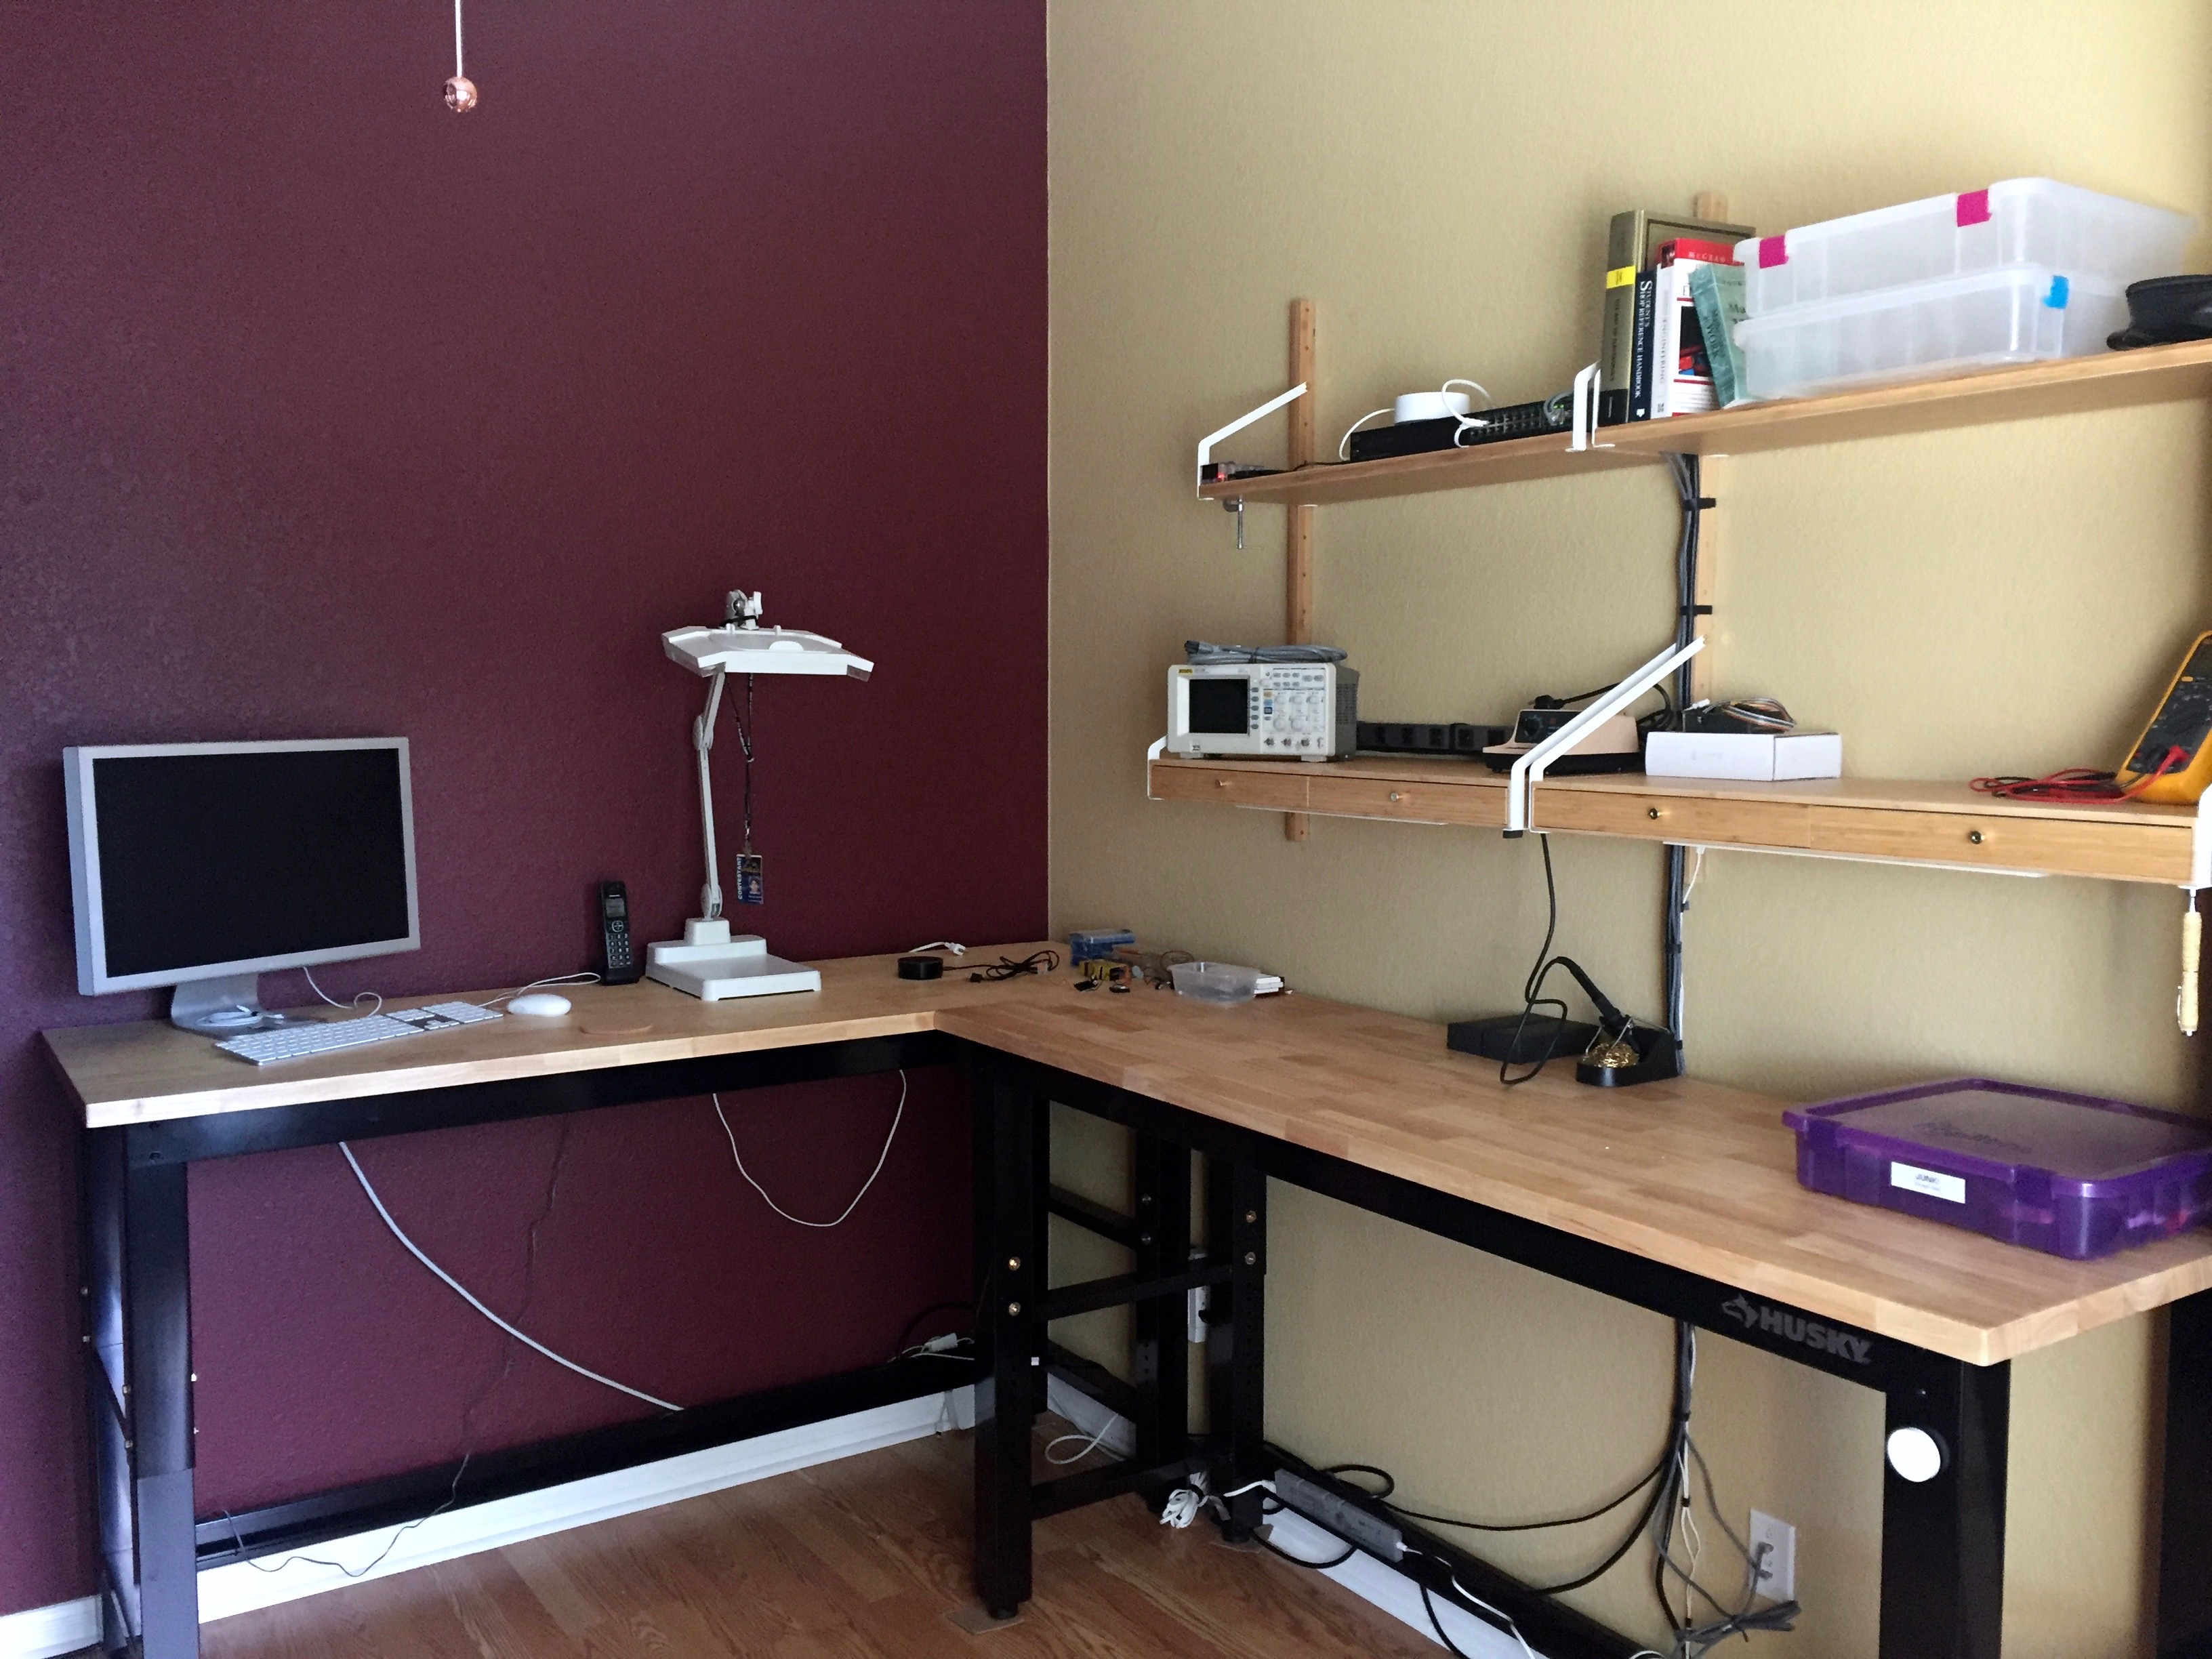
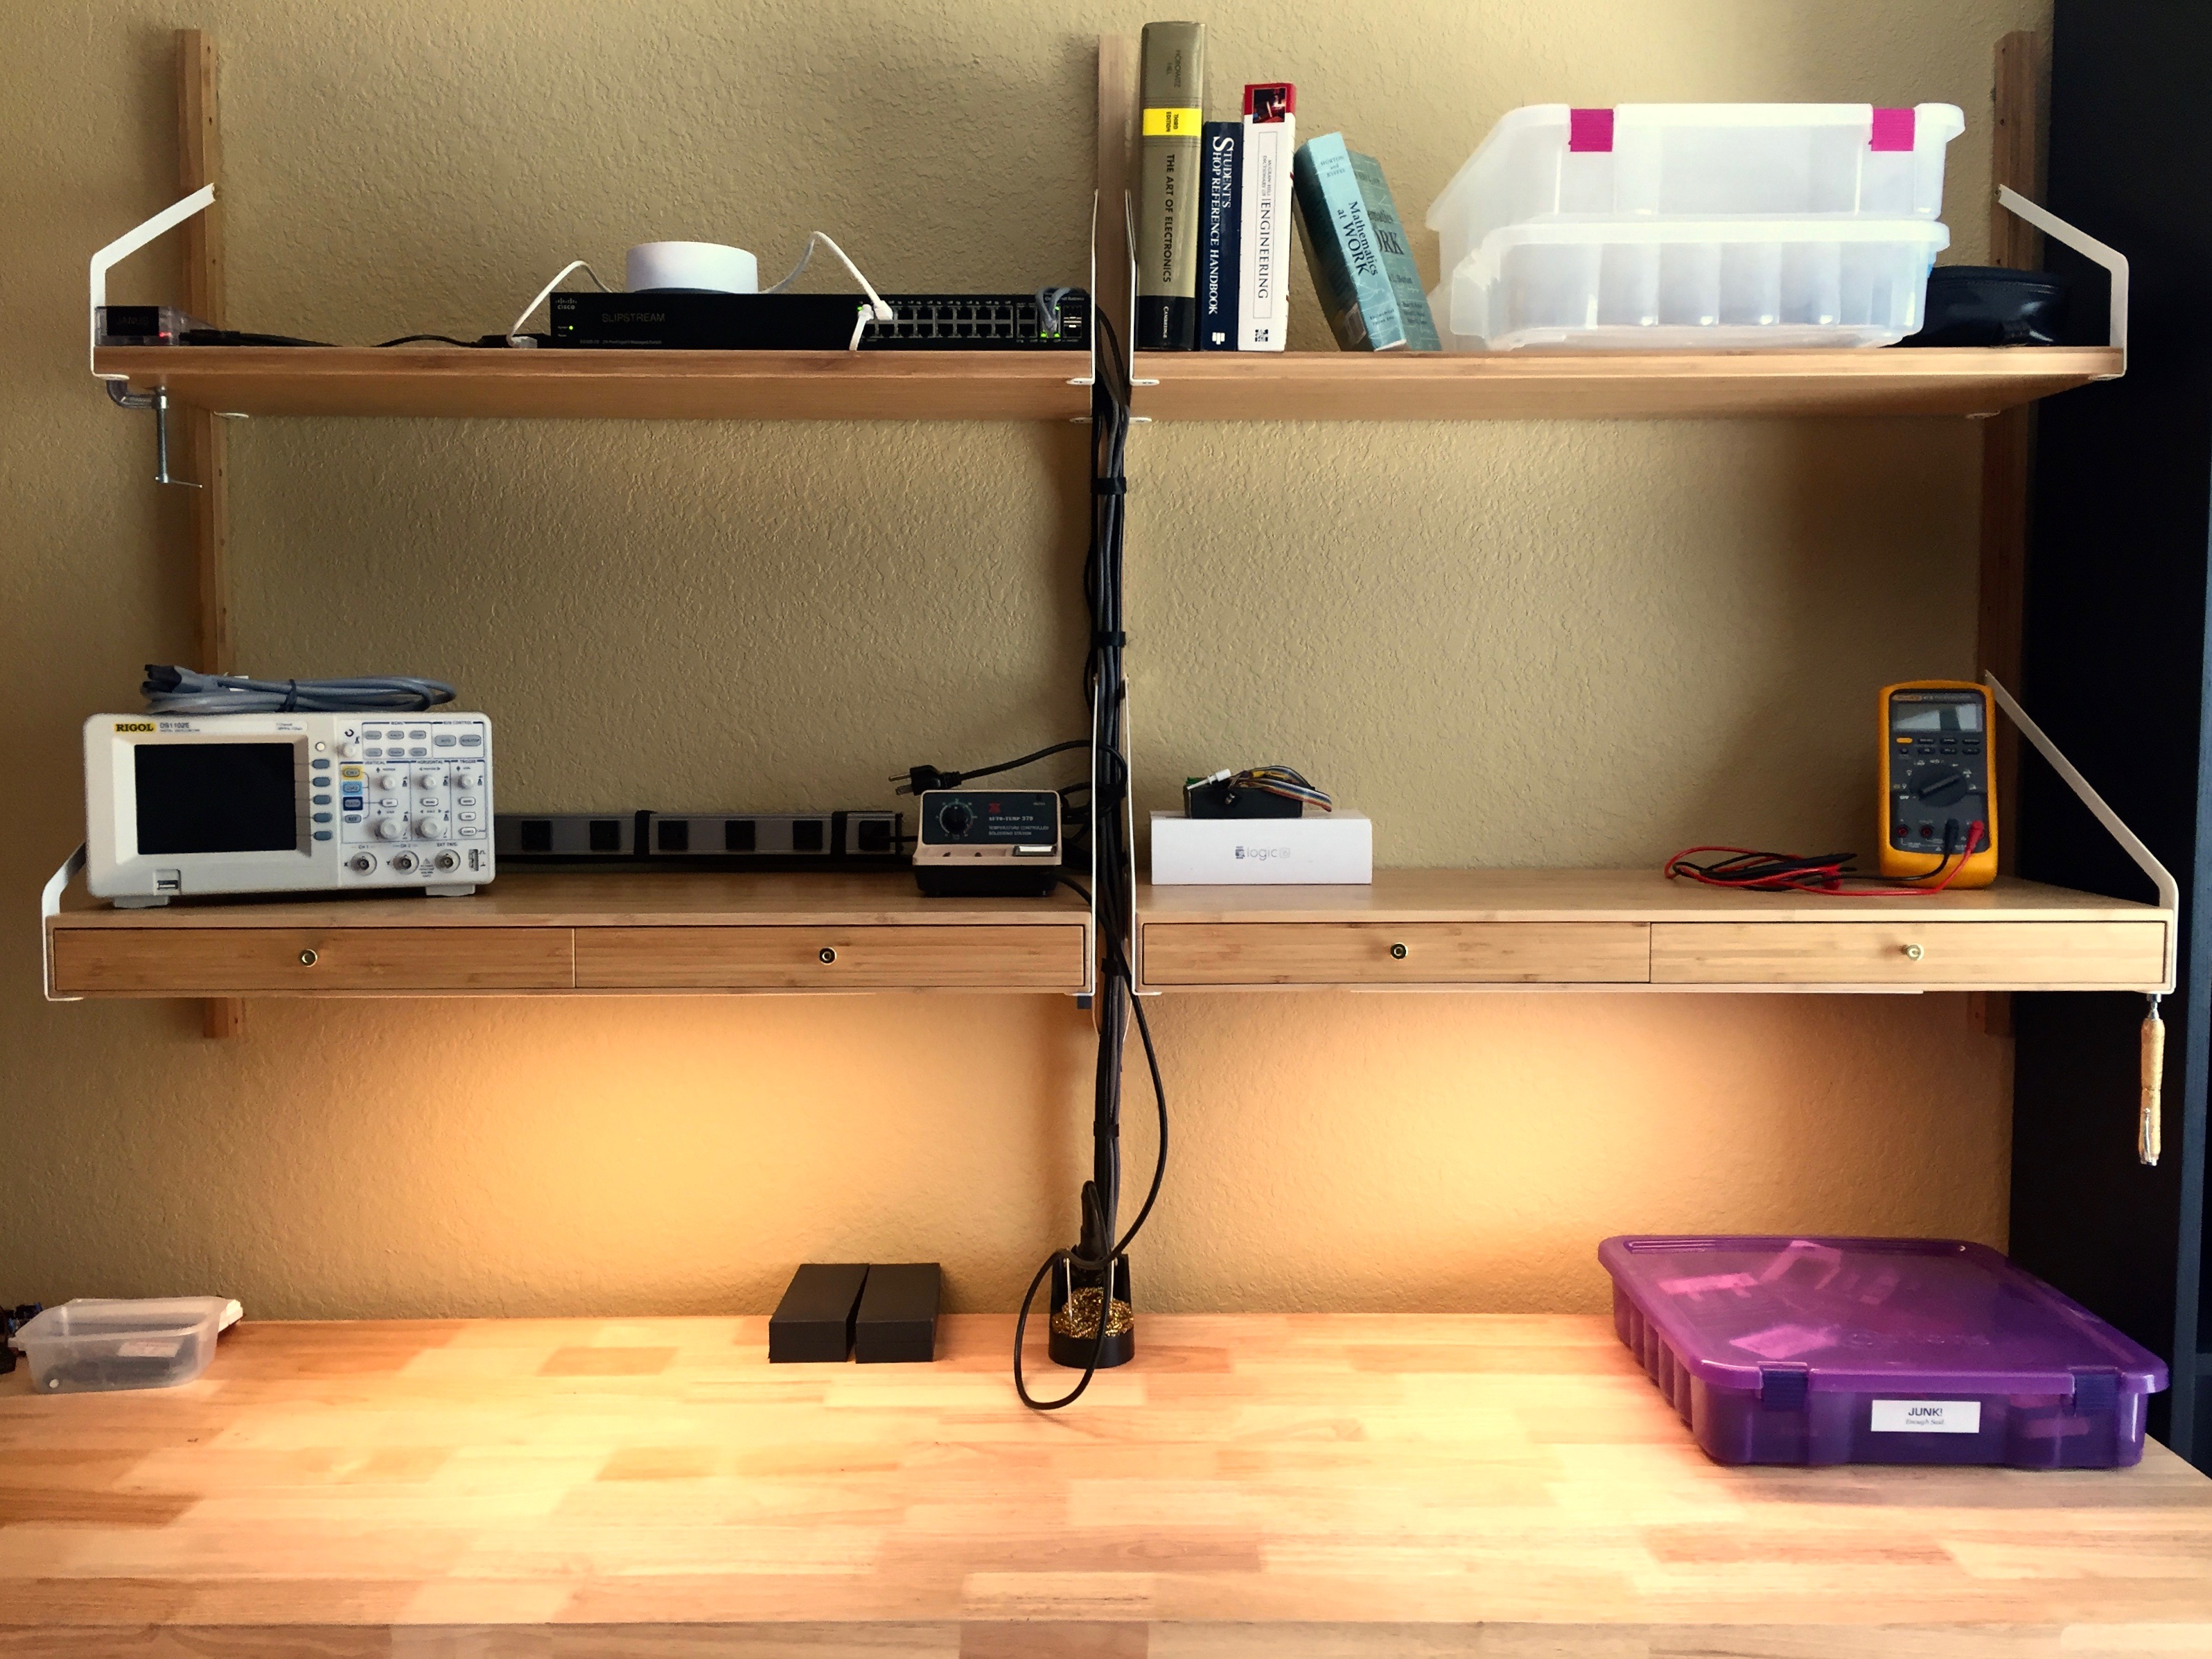
The concept is simple: lots of bench space, with shelves behind them to hold test equipment and similar gear. There needs to be power available on those shelves, too; there’s nothing worse than having a bundle of eighteen power cables hanging down.
 IKEA to
the rescue.
IKEA to
the rescue.
IKEA? My wallet hates you.
This time my answers were found in their SVALNÄS shelving system; it was the only one I found with a decent load capacity and fourteen inch deep shelves (which isn’t perfect, but better than the typical ten inch). It’s actually the desk unit, and has a couple of drawers as a bonus – perfect for keeping small tools in. A couple of the shallower general-purpose shelves added some utility space at the top.
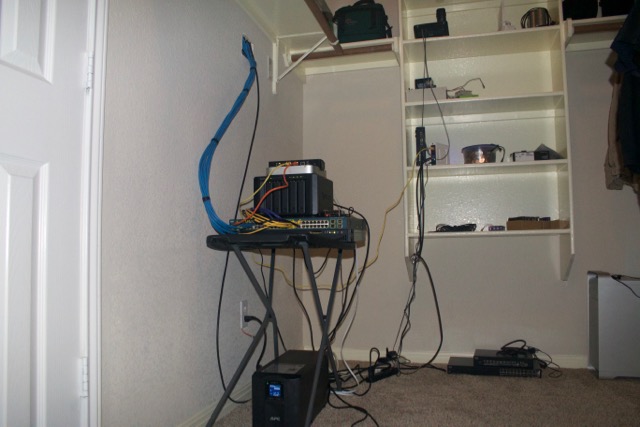
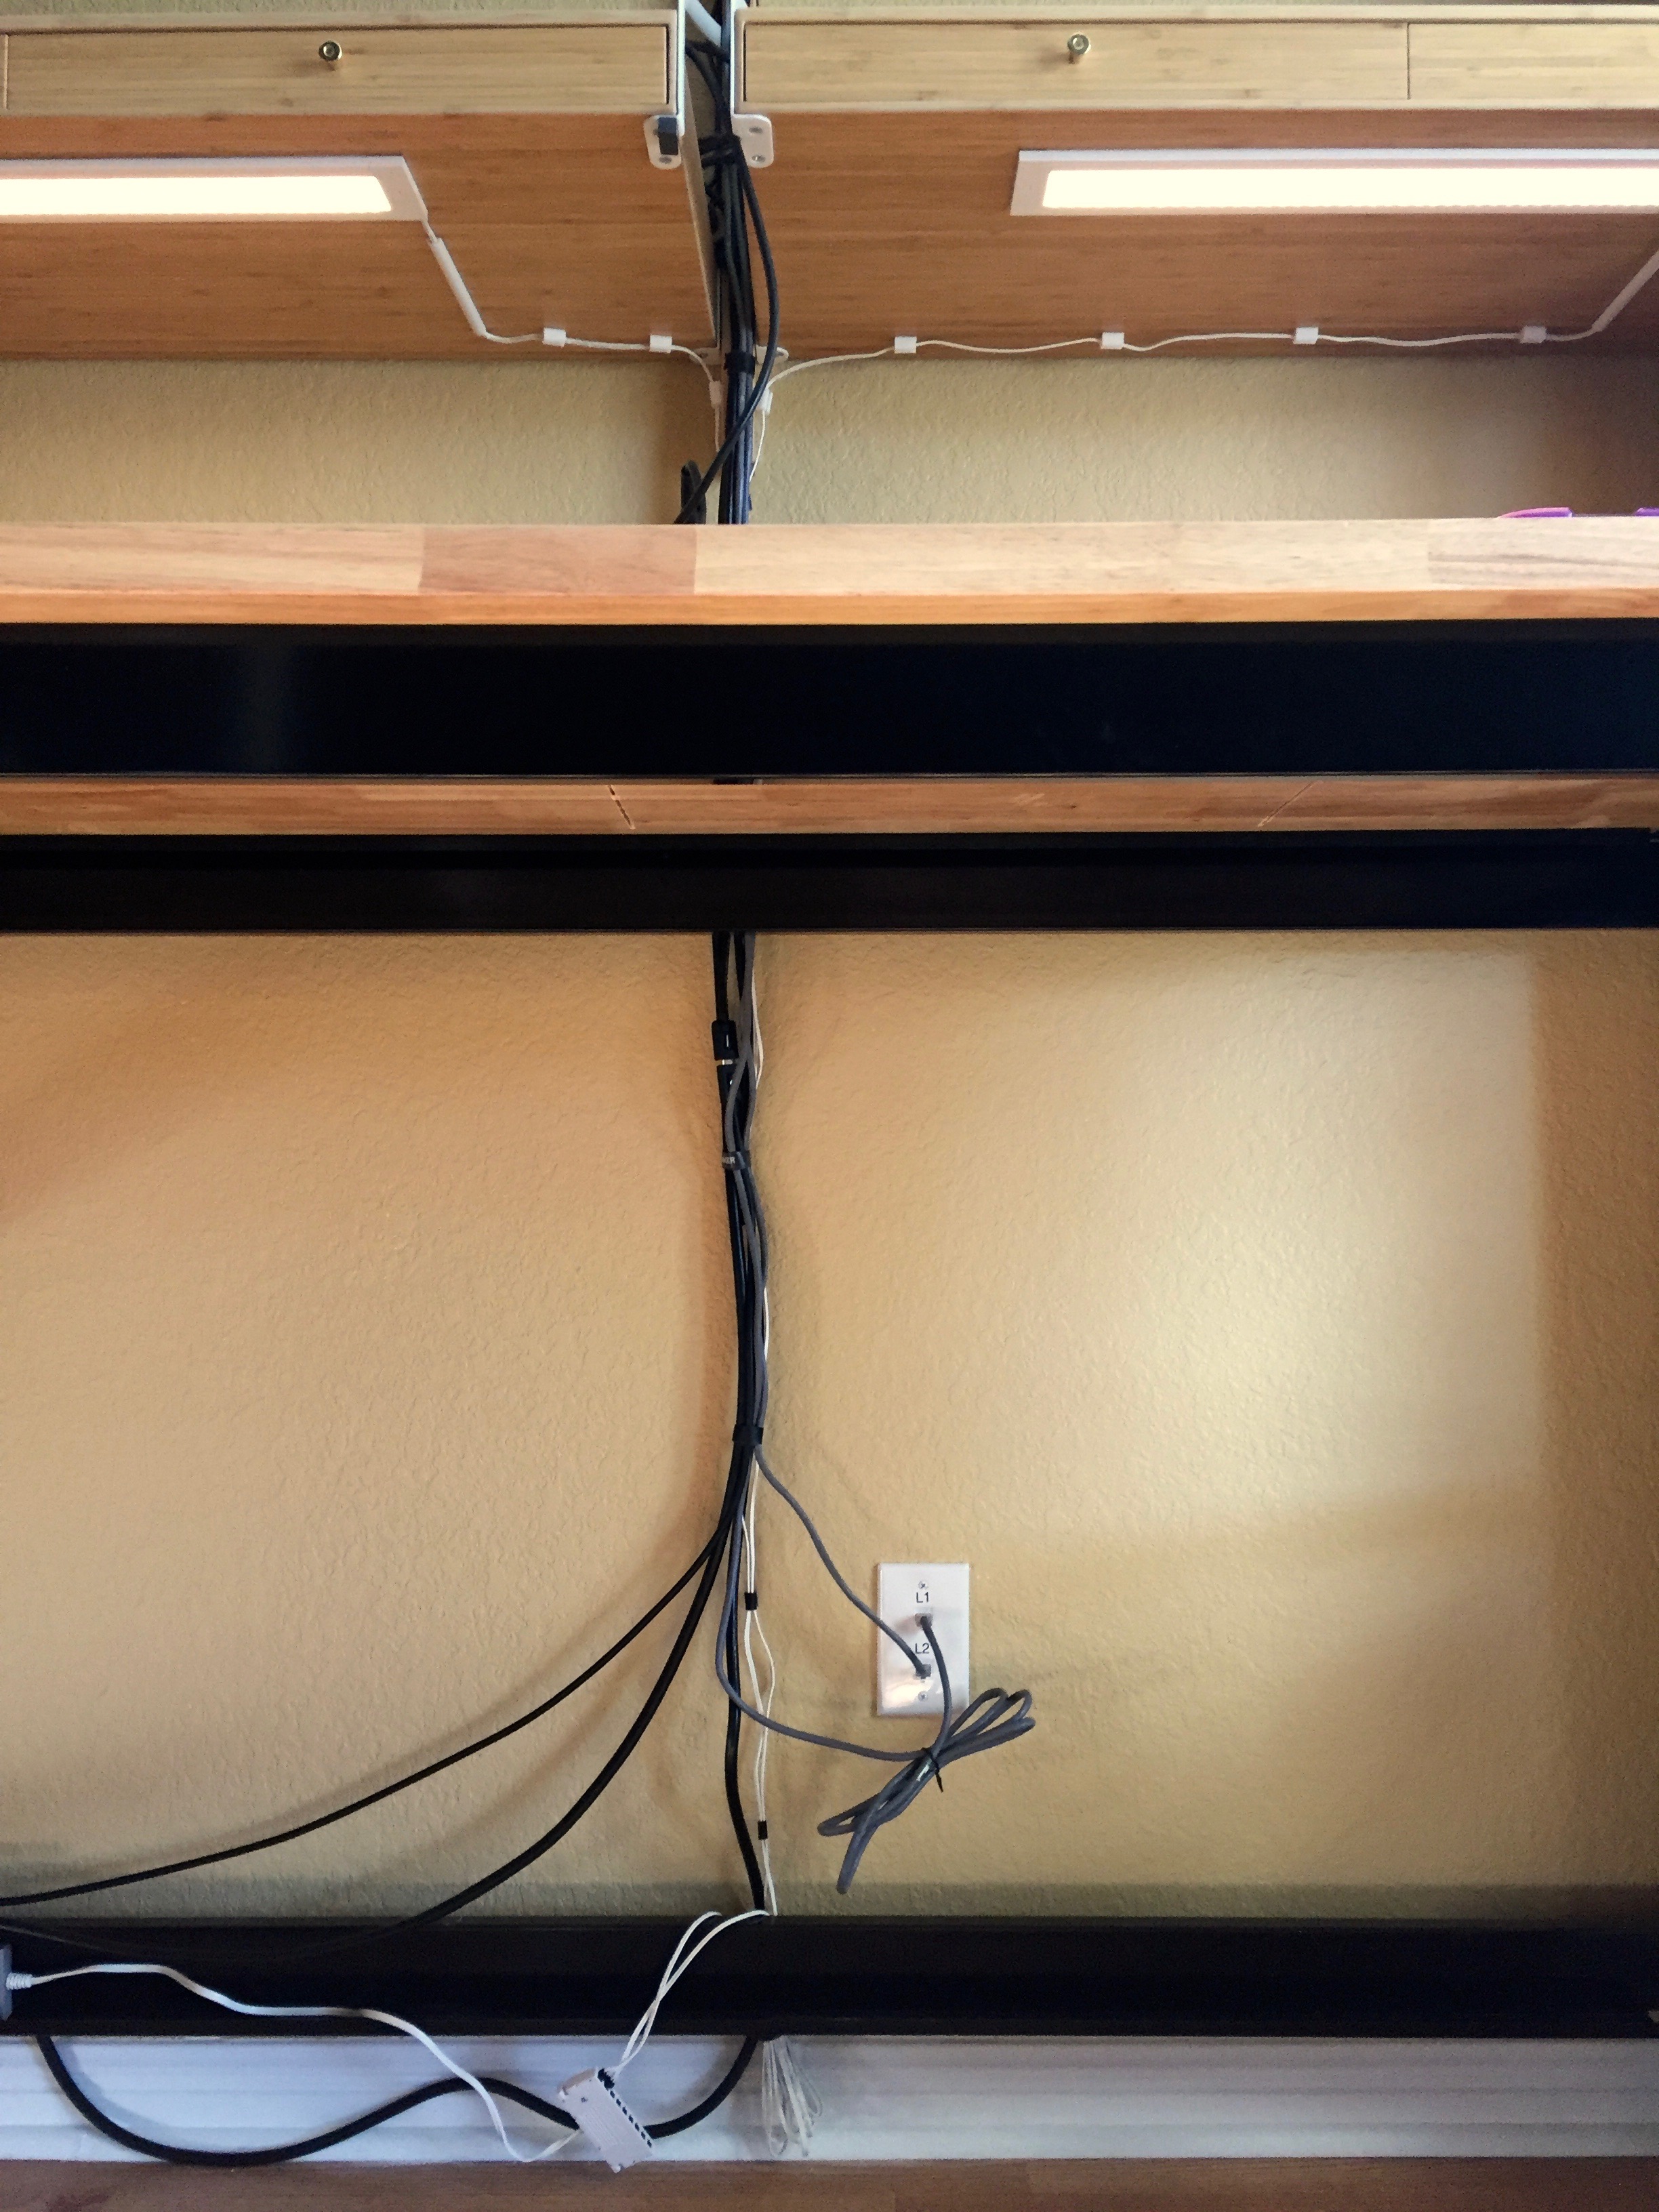
A few wall-mount power strips resolve the power issue (you can see one mounted in the middle of the image on the left; I haven’t gotten around to doing the other three yet). I’ll probably install similar strips right above above the workbench to ensure that plenty of power is available there as well.
I’ll probably need a dedicated circuit or two installed at some point to support all that potential power use, but I’ll worry about that when it becomes an issue; a dedicated circuit is already on my to do list for the rack my servers live in anyway, so it might just be time to call an electrician soon.
Storage?
 As you
can see, there is plenty of storage space. At some point I’m
actually going to pull out the middle 30" bookshelf and replace it
with a pair of the 15" ones; the resulting cubbies will be more useful
for storing smaller parts and other random things. I can even add
cabinet doors at some point if I want to hide the contents, though I’m
not currently planning on that.
As you
can see, there is plenty of storage space. At some point I’m
actually going to pull out the middle 30" bookshelf and replace it
with a pair of the 15" ones; the resulting cubbies will be more useful
for storing smaller parts and other random things. I can even add
cabinet doors at some point if I want to hide the contents, though I’m
not currently planning on that.
The only thing left to do is to actually install the shelves; I’ve not done that yet because I don’t yet know what all I’m going to store in there. I’ll put the shelves in as I need them I suppose. With that much space, it might take a while to fill it up.
Yeah, yeah, I know. Famous last words…
Dropping Anchor
Freestanding bookshelves have a problem: they are NOT stable. It doesn’t take much to push one over, and when the unit is nine feet tall, that can be extremely dangerous. This is why everyone recommends that you secure your shelves to a wall, even when you don’t live in earthquake country.
This left me with a problem. I could secure the two end units easily enough, but the remaining units weren’t going to be so easy. They were already secured to each other back-to-back – which really helped – but it wasn’t enough. My nephews are two and four years old; mischief is inevitable, especially with a new room to explore.
 I
also wasn’t real thrilled about the fact that the shelves didn’t reach
the ceiling, and it wasn’t going to happen even with additional
extensions. They wouldn’t fit. This made my freestanding shelf wall
look like… a bunch of freestanding shelves.
I
also wasn’t real thrilled about the fact that the shelves didn’t reach
the ceiling, and it wasn’t going to happen even with additional
extensions. They wouldn’t fit. This made my freestanding shelf wall
look like… a bunch of freestanding shelves.
Not the effect I’m going for here.
I don’t know where the idea came from – I really don’t – but at some point I got to thinking about Pergo. You know the stuff: hardwood floor planks that lock together. “Y’know,” I thought, “I bet those planks are long enough to reach from the shelves to the wall…”
And the rest is history.
Yeah, I built a false ceiling out of floor planks. Deal with it.
 Shockingly enough, it worked extremely well once I figured out how
to get them locked together properly when installing them upside
down. The planks are thick enough that there isn’t a whole lot of give
in them. They’re anchored to the wall on one side (yay angle brackets
and drywall anchors!), and screwed down to the shelves on the other.
Shockingly enough, it worked extremely well once I figured out how
to get them locked together properly when installing them upside
down. The planks are thick enough that there isn’t a whole lot of give
in them. They’re anchored to the wall on one side (yay angle brackets
and drywall anchors!), and screwed down to the shelves on the other.
I wouldn’t trust a single plank to anchor the shelves, but with all of them combined it works beautifully. Add a bit of decorative molding, and I have – instead of freestanding bookshelves – a brand new hallway with built-in bookshelves. A subtle difference, but an important one!
IKEA Strikes Back And A Bit Of Polish
 I’m
sure you noticed that there are recessed lights all properly mounted
in my false ceiling.
I’m
sure you noticed that there are recessed lights all properly mounted
in my false ceiling.
Yup.
Those were actually a Home Despot impulse buy; they’re 4-inch dimmable LED units with (unfortunately not remotely) selectable color temperature. One 4" hole saw, some Romex, a junction box, a “replacement” power cable, and a spare GE Z-Wave dimmer later, and I had functional lighting for my added hallway that I didn’t even have to hardwire to the house!
Of course, some detail work was also needed; I couldn’t just let it go at that. A certain group of evil Swedes happens to make some very nice low profile LED lighting. And it’s ZigBee-based.
Yeah, I was surprised that it’s as good as it is.
 So I ended up investing in some TRÅDFRI
LED drivers, and STRÖMLINJE slimline under-counter lights. A bunch
went in the center shelves between the outward-facing cabinets; I
figured these would make a nice knick-knack display. I also mounted a
couple under the shelves over the workbench, which gives really good
work light in there.
So I ended up investing in some TRÅDFRI
LED drivers, and STRÖMLINJE slimline under-counter lights. A bunch
went in the center shelves between the outward-facing cabinets; I
figured these would make a nice knick-knack display. I also mounted a
couple under the shelves over the workbench, which gives really good
work light in there.
I used way more of the TRÅDRFI drivers on the knick-knack shelves than I needed (I could’ve just used one of the 30-watt ones, but used a bunch of 10-watt units instead). Why? So I can do interesting animated things with my knick-knack shelves at some later date.
I’m a geek. This surprises you?
Inbound Connectivity
I’m not a real big fan of wireless networking. Were it more readily available (and far less expensive) I would actually want wired control for my home automation, too. It’s not that wireless is bad; it’s that it’s simply not as reliable and performant as wired connections are.
 I
rarely get bit by a bad ethernet cable. A bad wireless signal, though?
That happens way more often than most people will admit to (or, in
many cases, even realize). End result? I go to the trouble of adding
ethernet ports wherever I might need a computer, and the workshop is
one of the better examples of such a space.
I
rarely get bit by a bad ethernet cable. A bad wireless signal, though?
That happens way more often than most people will admit to (or, in
many cases, even realize). End result? I go to the trouble of adding
ethernet ports wherever I might need a computer, and the workshop is
one of the better examples of such a space.
I opted to put the ports on the far wall, which made it easy because the sill at the top is easily accessible from the attic. The only difficulty is that the wall is insulated – the garage is on the other side – but a set of fiberglass fish rods made quick work of that issue. I dropped two Cat6 cables (which is my minimum when I go to the trouble of doing this); the other end of those cables is in the closet with my servers, and they’re patched into my Cisco 3560G.
When I installed that particular switch, it actually replaced a Cisco SG300-20, which I’ve now repurposed to serve the workshop. One of the ports is a point to point routed uplink to the 3560G (the workshop has its own isolated /16), and the other is currently bridging over my home automation VLAN for experimental purposes. I’ll probably make that a trunk eventually, but I don’t need (or want) any other VLANs in the workshop at the moment.
Yes, I could have done it all over one trunked link. I enjoy playing with routing.
A Workstation for the Workshop
 No electronics workshop is complete
without a computer. I considered a (very) old Mac Mini running Linux,
but that thing is truly ancient. Instead I grabbed one of the
Raspberry Pi 3’s I have laying around. It’s not much, but it’s more
than enough for my purposes in there. I’m guessing it will run KiCad
just fine, though time will tell on that score.
No electronics workshop is complete
without a computer. I considered a (very) old Mac Mini running Linux,
but that thing is truly ancient. Instead I grabbed one of the
Raspberry Pi 3’s I have laying around. It’s not much, but it’s more
than enough for my purposes in there. I’m guessing it will run KiCad
just fine, though time will tell on that score.
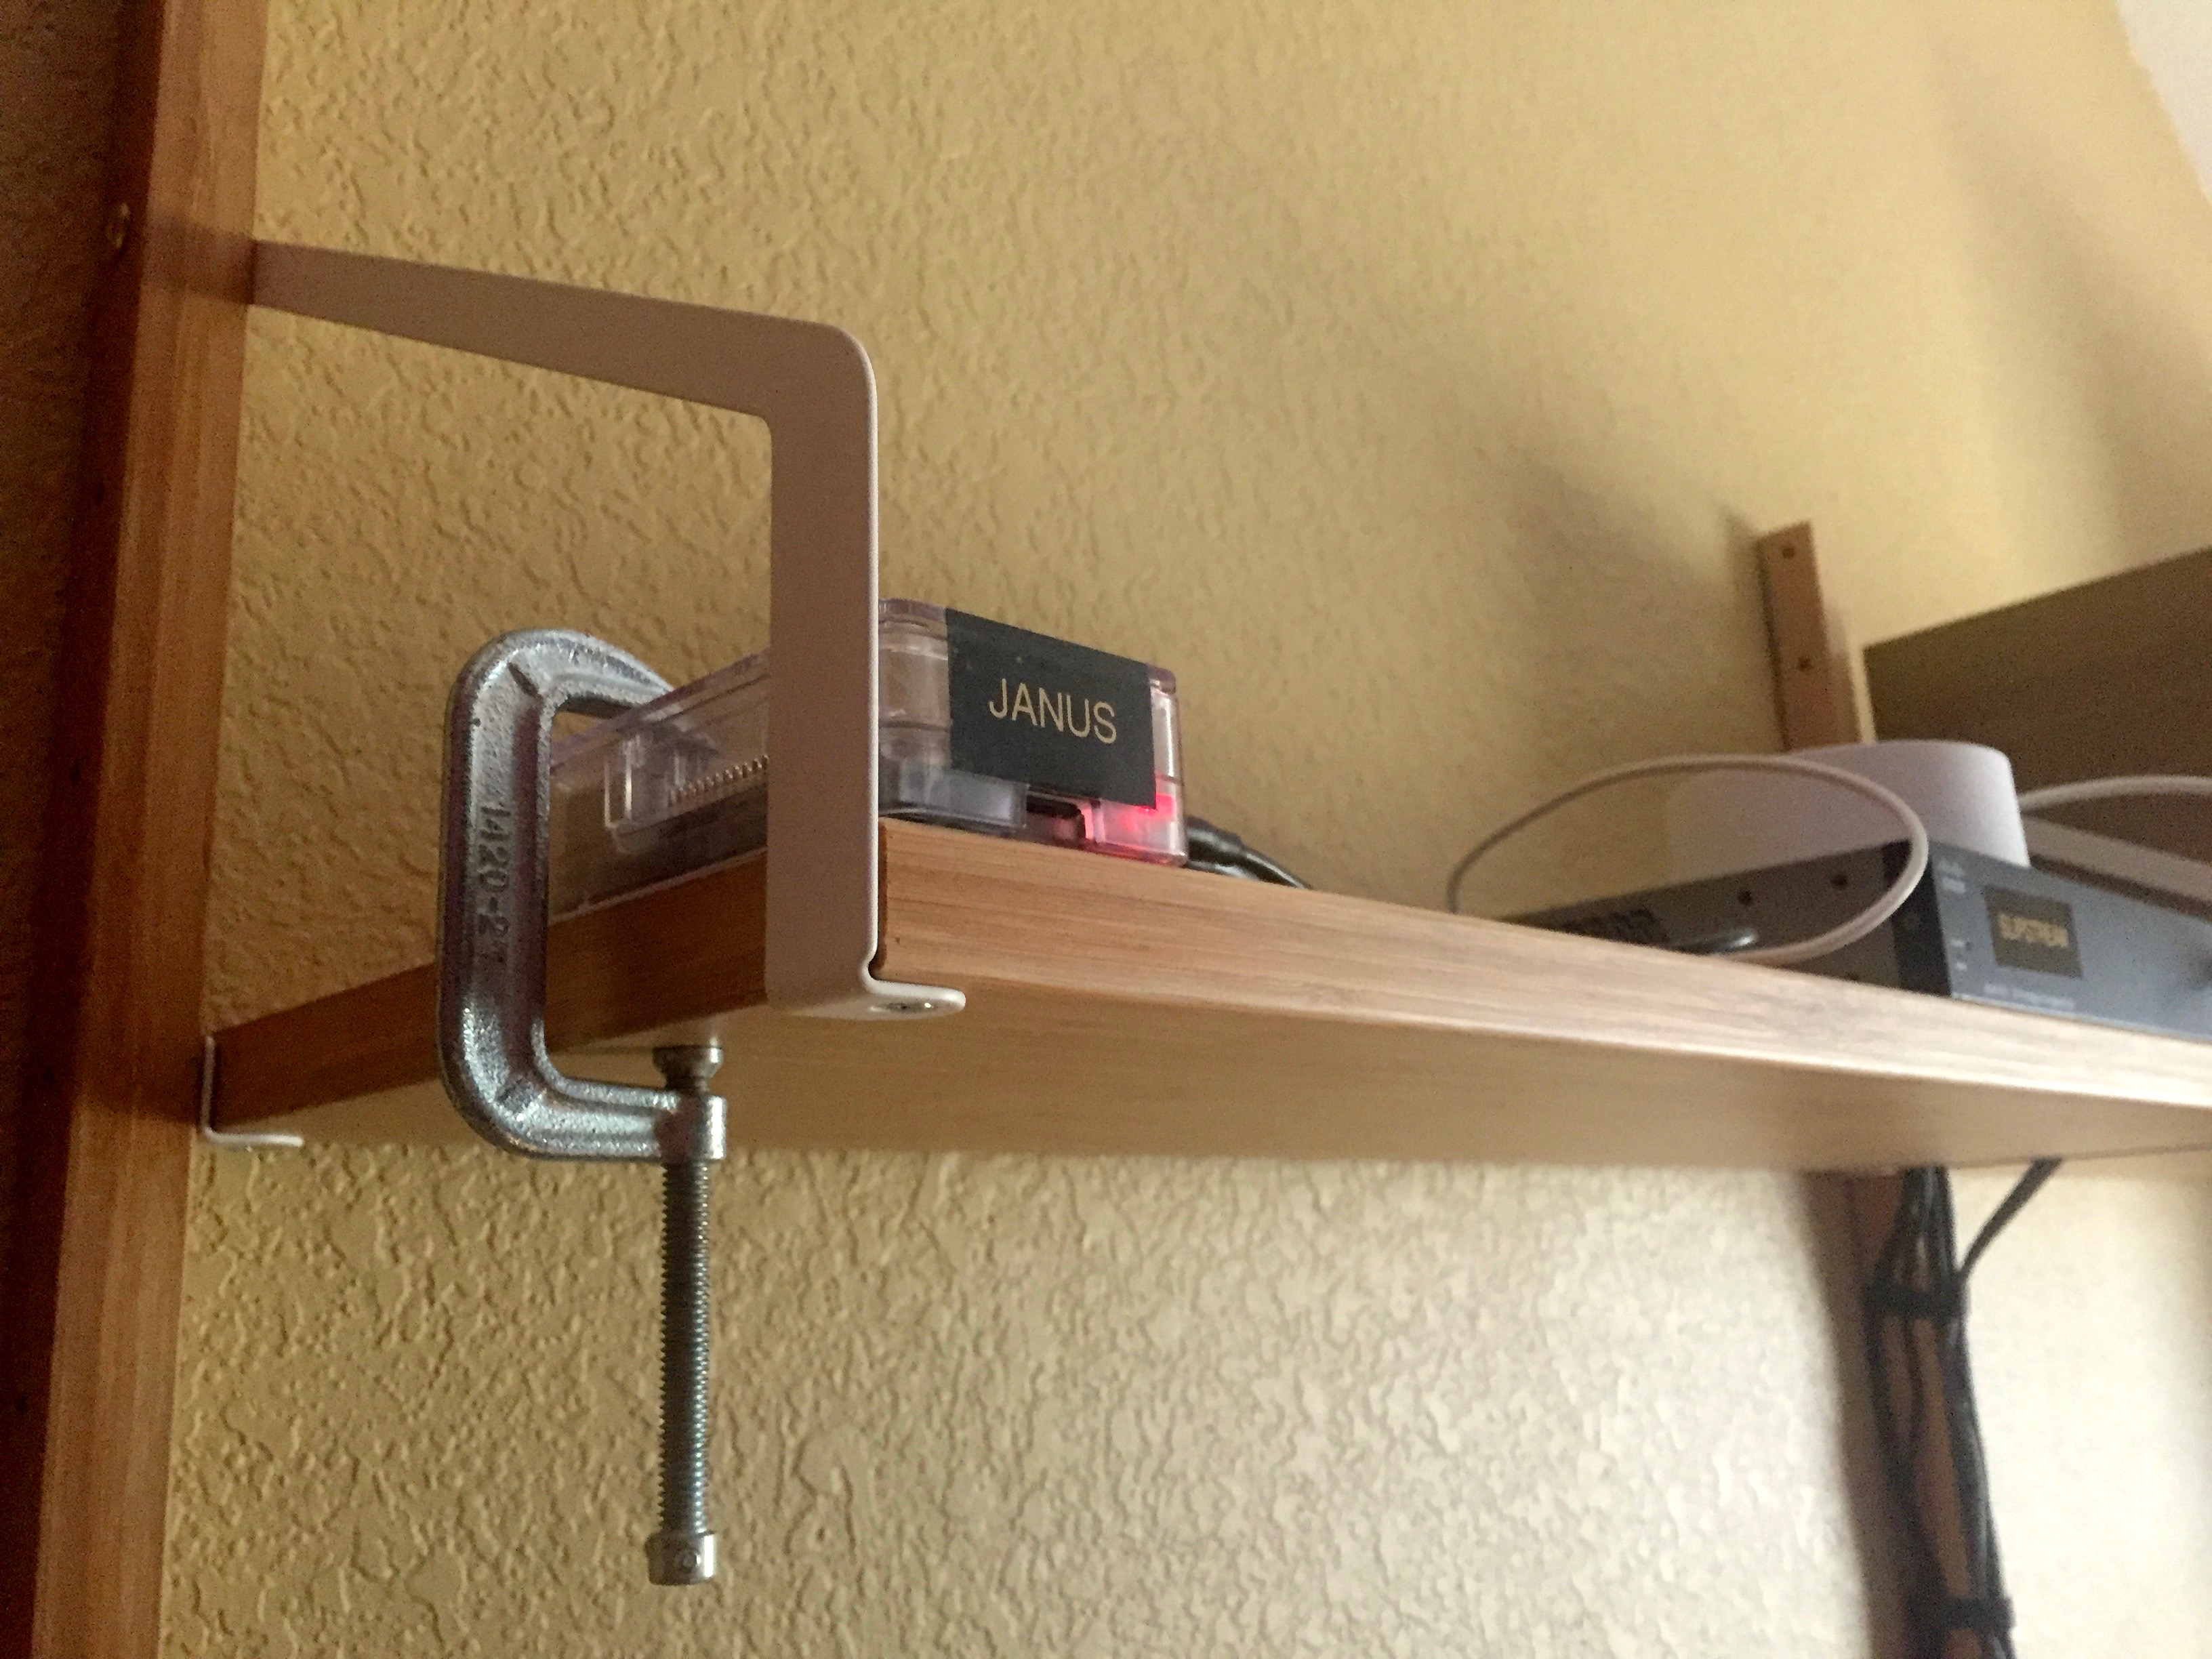
Add a long HDMI cable, an unused 23" Apple Cinema Display, and a C clamp to hold the thing in place on a shelf, and life is good.
This is, in and of itself, an experiment. I’m curious to see if a Pi can successfully fill this role. If not, I’ll most likely replace it with an iMac (I have an older one in the kitchen that isn’t quite enough for that purpose any longer, but it would work fine in the workshop). We’ll see how long it takes me to get frustrated with the limitations…
The Final Touch
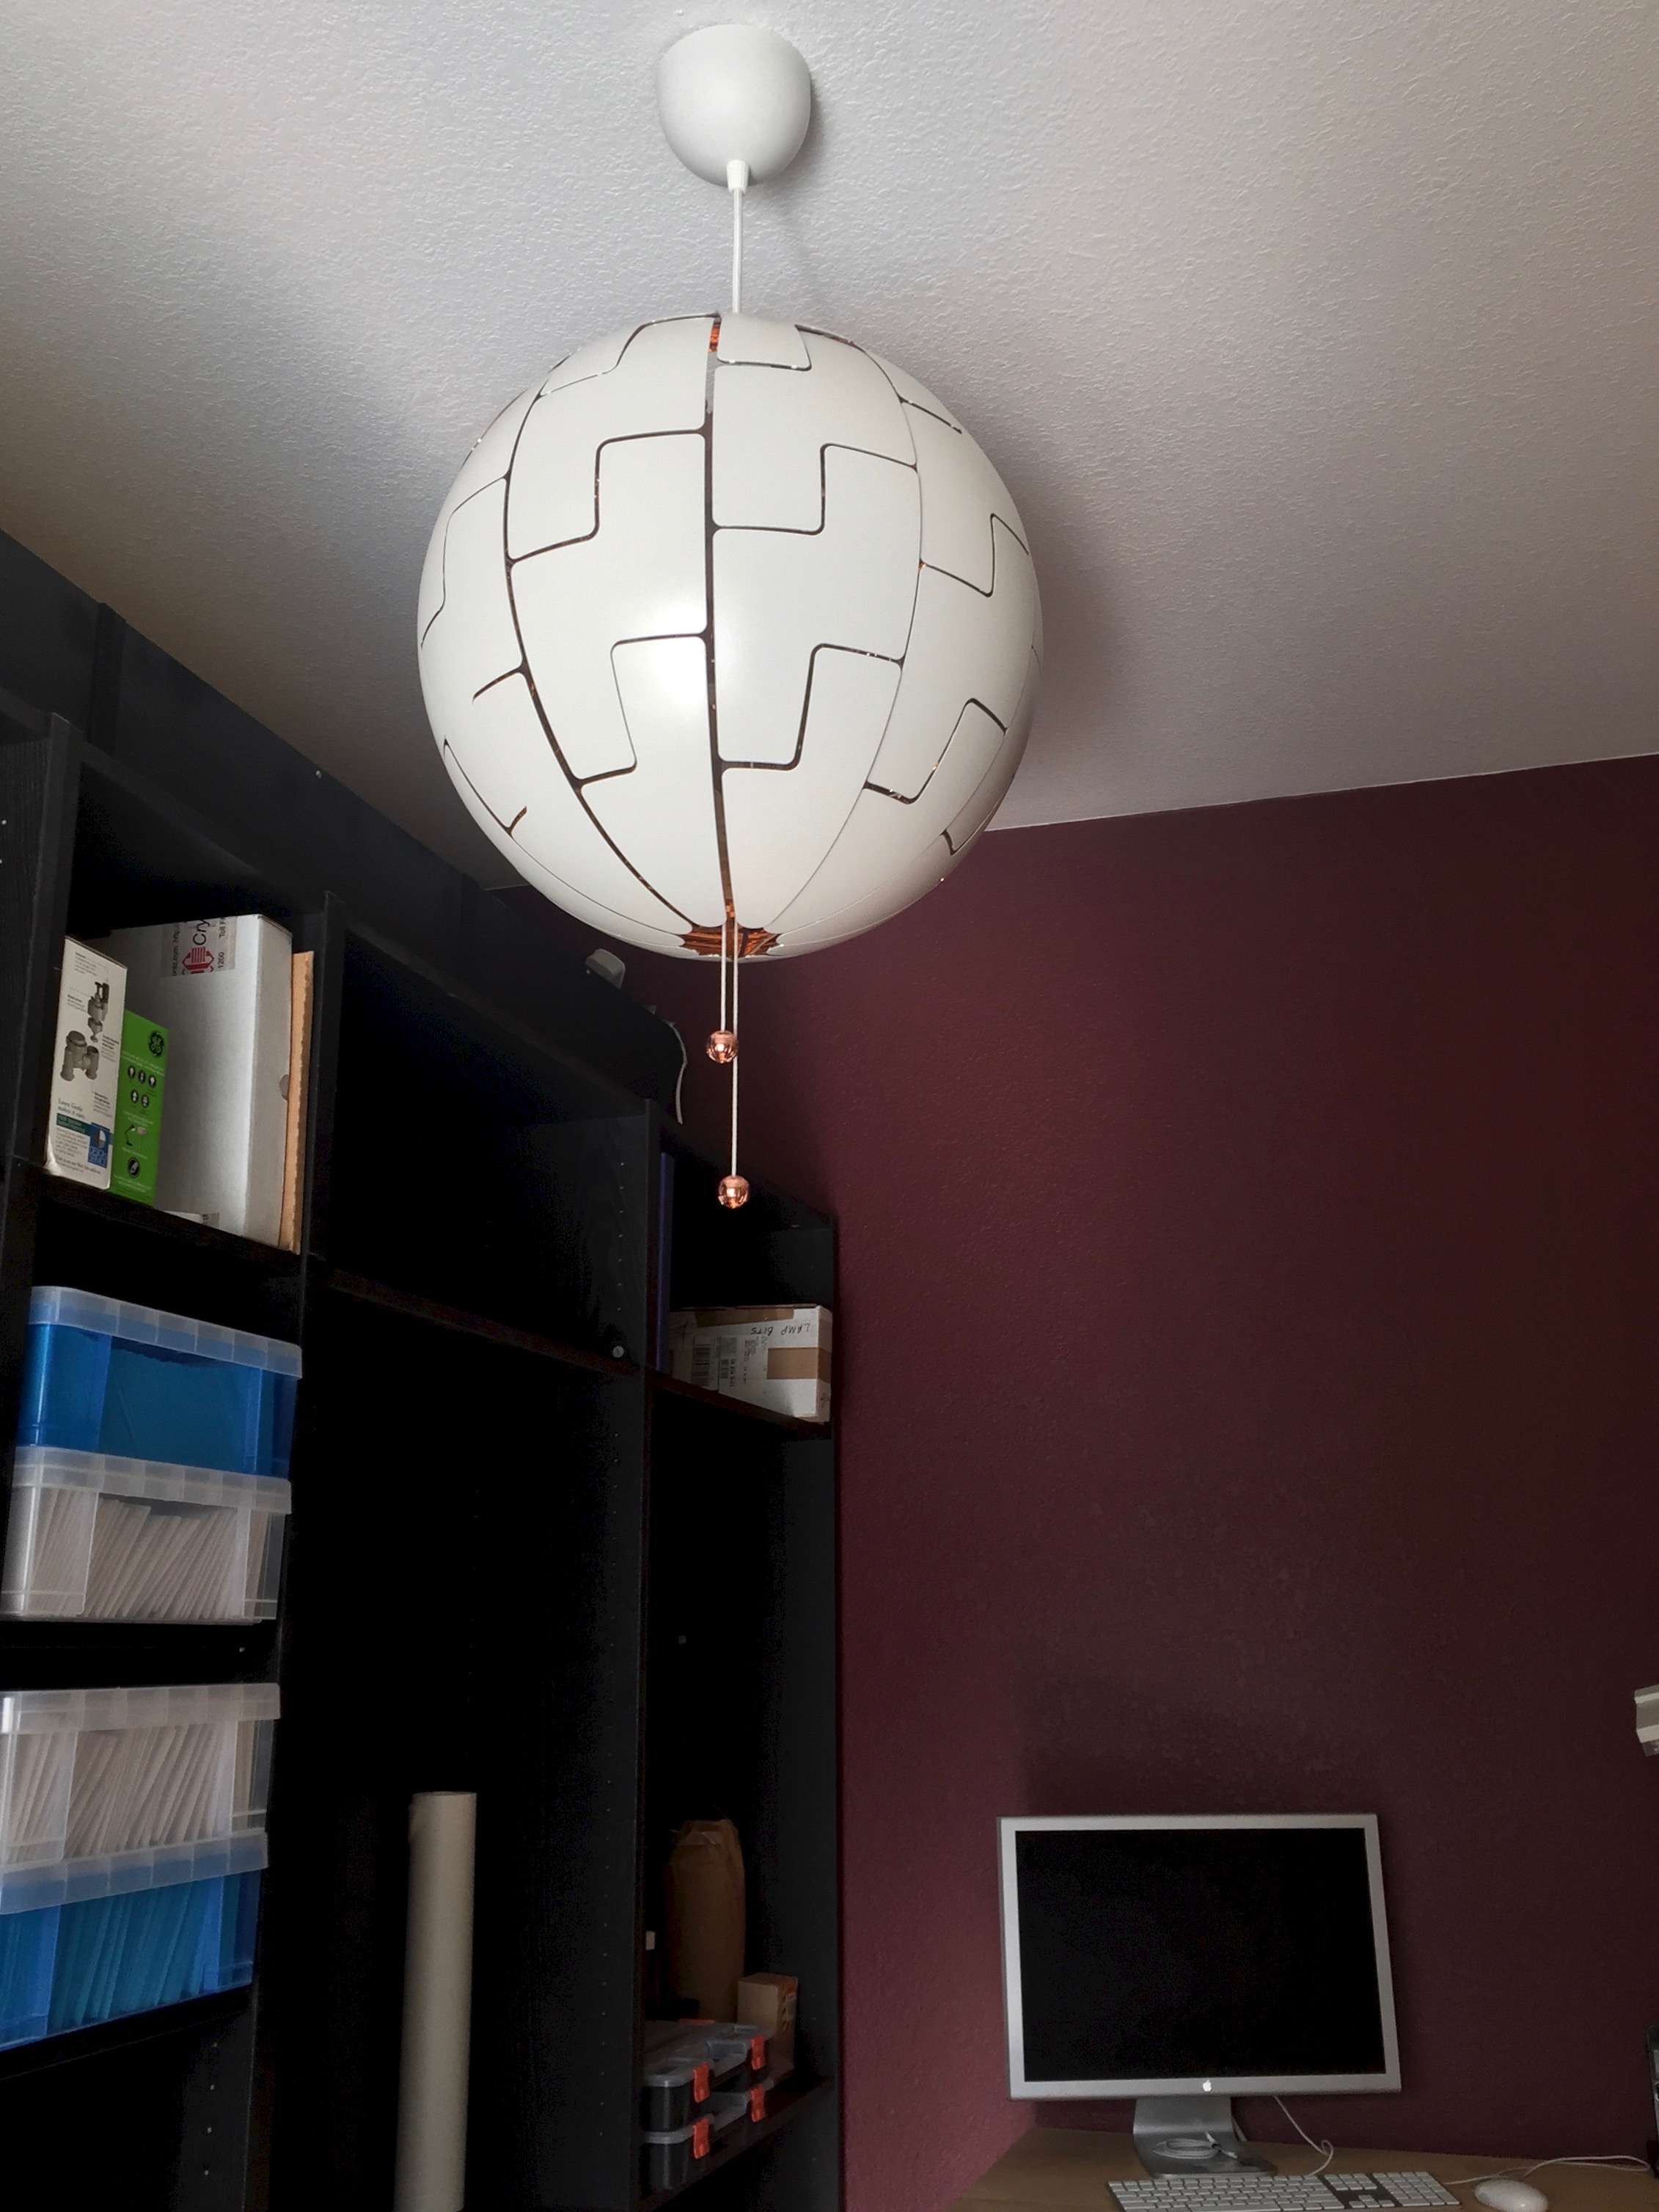 I haven’t mentioned the chandelier that
was in the room originally, have I? I hated that thing (not least
because I was forever bumping my head on it before I finally tied it
up, but it was also ugly).
I haven’t mentioned the chandelier that
was in the room originally, have I? I hated that thing (not least
because I was forever bumping my head on it before I finally tied it
up, but it was also ugly).
So I ripped it out and built my very own Death Star.
Hey, I was already signing away my first-born to IKEA anyway…
I saw this thing a year or so ago, and kinda wanted one ever since. Where better to put it than my workshop? You can’t really put one of these in a main living area and get away with it, and my bedrooms and office all have ceiling fans that I’m not getting rid of, so this was really the only place I could think of to have one.
The downside is that they’re designed more as decor than as utility lighting, and they’re pretty dim. It’s enough for now – I have my bench lighting to work by anyway – but at some point I may be forced to put a real fixture in. In the mean time, however, this thing is actually pretty cool.
It does get some strange looks, however. It is NOT a normal chandelier!
Future Plans
The main thing I’m contemplating is what to do with the wall over the other workbench. I could just put more shelves up – I’d certainly use them – but there are also other ideas.
What about a big TV (or monitor) on the wall?
I also have room (that isn’t shown in the pictures) for a more utilitarian shelf next to the long bench; I really want a 3D printer at some point, and that’ll be the ideal location for it. I don’t think they’re very loud (especially if you get the nice enclosures), so it should work out pretty well there.
Some cable management also wouldn’t go amiss; I can’t stand a visible rats nest of ugly cables, and that’s exactly what I have at the moment. I’ll bundle some of it up to make it neater, but I’ll probably do something more creative eventually. A couple of those in-wall cable channels that the AV installers like to use when they put your TV on the wall would go a long way toward cleaning things up.
Beyond that?
I just need the time to start my next project. Now that I have the space (and won’t have to put everything away when I’m done with it every night), I’m hoping I’ll be able to actually get something fun going. It’s been two years since I bought the place, and one of my major goals has been to have a place to actually practice my hobby.
Now I have it.
And I can’t use it.
Because IKEA has all my money.
Go figure.